Manifest Technology Blog
-- Site:
| Articles
| Galleries
| Resources
| DVI Tech
| About
| Site Map
|
Articles:
| PC Video
| Web Media
| DVD & CD
| Portable Media
| Digital Imaging
| Wireless Media
| Home Media
| Tech & Society
|
DVD & CD:
| DVD & CD Articles
| DVD Software Gallery
| High-Def DVD Gallery
| DVD Authoring Resources
|
Next-Generation Consumer DVD Authoring:
Ulead DVD MovieFactory 5 &
Roxio MyDVD 8 (8/2006)
by Douglas Dixon
Ulead DVD MovieFactory 5
Launcher
Straight Capture to Disc
Assembling Clips
Designing Menus
Burning
Roxio MyDVD 8
Components
Workflow
Importing and Editing
Menu Editing
Burning
Ulead DVD MovieFactory 5 and Roxio MyDVD 8
References
There's a lot of mystery and magic to making a DVD, but consumer software
products like Sonic MyDVD and Ulead DVD MovieFactory have been available for
years now to make it relatively easy. While these tools, you simply can drag and
drop your clips into a template menu design, with the trade-off that you lose a
lot of the possible flexibility of the DVD format. But consumers are getting
more sophisticated, and high-definition camcorders are becoming affordable, so
it's time for the next generation.
Which brings us to the new Ulead DVD MovieFactory 5 and Roxio MyDVD
8, both released in the first quarter of 2006. Both support working with HD
video (and photos), at both normal 4:3 aspect ratio and 16:9 widescreen. Of
course, regular DVDs only store standard-def video, but HD content still looks
great.

Then as the new blue-laser high-def DVD formats come to market, you'll be
able to burn both the HD DVD and Blu-ray Disc formats (DVD MovieFactory already
has some support built in, and Sonic will add it as the burners become
available). And MyDVD 8 also support the DivX HD format, for storing HD video on
regular DVDs to play back on compatible set-top DVD players.
Both of these new versions also provide great flexibility in designing more
interesting-looking discs: you can use the menu templates, and then move and
resize each element, and add your own additional text and graphics. You can edit
and enhance your video clips and photo slideshows, adding nice transitions and
pan and zoom effects. DVD MovieFactory even now provides menu in / out
transitions for smooth segues between menus selections and the associated video
clip.
Ulead DVD MovieFactory 5 was announced in March 2006, with support for
high-definition video and discs, and even more flexibility in designing and
customizing DVDs (www.ulead.com/dmf). It
is available for $49.99, or as a $39.99 upgrade. You also can download a 30 day
trial version, or send off for the $9.99 CD with trial versions of all the
latest Ulead products.

Ulead has changed direction with the product. The previous release, DVD
MovieFactory 4 Disc Creator, continues to be available as a suite providing a
"one-stop" CD and DVD burning solution, including additional features
for data disc burning and backup, audio ripping and burning, Video DVD
extraction and shrinking, and DVD playback. But if you want HD support and more
creative menu authoring, you can add the new Ulead DVD MovieFactory 5 as well.
The biggest news with this release is support for HD content, including
direct capture from HD camcorders, HD photo slideshows, and 16:9 widescreen
displays. DVD MovieFactory 5 is ready for the next generation -- high-definition
blue-laser disc, in both Blu-ray Disc and HD DVD formats. You can author to HD
DVD, and record Blu-ray direct-to-disc, in MPEG-2, HDV, or DV formats. (Of
course, we still need the associated new products -- HD burners, set-top
players, and software players -- to really use these functions, but it's amazing
that low-cost authoring tools are even available so early for these new
formats.)
Besides the main Ulead DVD MovieFactory 5 application, the product also
includes several other applications, including a new Launcher to help you
select the task to perform, and Ulead QuickDrop 2.0 for quick
drag-and-drop assembly of files for a data, music (including MP3 discs), or
video discs.
Ulead DVD DiscRecorder 2.2 turns your computer into a set-top
recorder, to capture, edit, and burn videos in the DVD-VR (Video Recording)
format used for re-editable discs in DVD camcorders and set-top recorders. You
can Create new discs, Edit existing discs (moving between the PC and set-top
recorders), and burn Straight to Disc on rewritable discs (without having to
first capture and process on hard disk). And Ulead BD DiscRecorder 2.5
performs a similar function for burning directly to Blu-ray Disc format.
The new Launcher screen helps you quickly get to what you want to do. You can
go directly to working on a Video Disc or Slideshow Disc, or use Edit Disc to
update a DVD you have already created. If you still need to prepare your
collection of clips, you can first use Import to capture from video devices and
extract from existing DVDs.
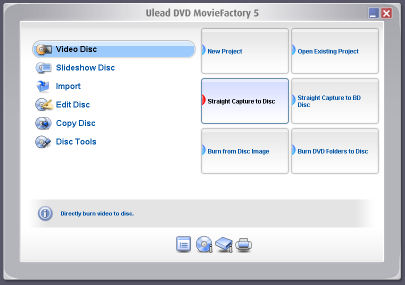 Launcher screen
The Launcher also provides some disc utilities, with Copy Disc to copy,
convert, and burn; and Disc Tools to format, erase, and close discs. The icons
at the bottom of the screen provide additional Preferences, Disc and Drive
Information, and Label creation.
We'll focus on creating a DVD, and therefore select the first Video Disc
task, which provides choices to start a New Project, Open an Existing Project,
Straight Capture to Disc, or Burn to Disc from DVD Folders or a Disc Image.
For the quickest path from a video tape to disc, use Straight Capture to
Disc. You can choose to create the disc in DVD-Video format on a write-once
DVD-/+R disc (for highest compatibility), or on a rewritable RW disc in DVD+VR
format (for re-editing, even on a set-top recorder) or in Ulead's "fast
re-editable" DVD-Video format (for efficient editing on a PC).
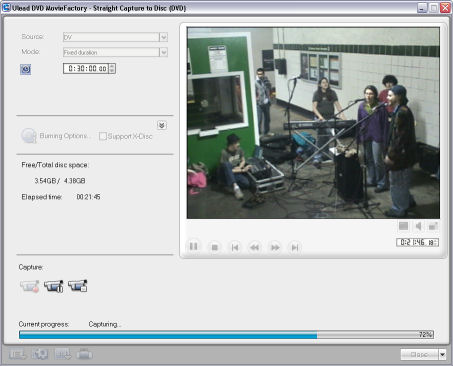 Straight Capture to Disc
For a Straight Capture, first choose the video source (i.e., DV camcorder)
and capture mode (i.e., for a specific duration or to the end of the tape). Then
choose the menu style, chapter options (i.e., add a chapter point every 5
minutes), and burning options (you can save the DVD MovieFactory project file on
the disc so you can re-edit it later).
Then press Capture and DVD MovieFactory will take care of the rest: rolling
the tape, capturing and compressing the video and audio, burning to disc, and
adding the menus and navigation.
The real fun with DVD MovieFactory, however, comes in editing your discs --
whether you're starting from scratch with a collection of clips or re-editing an
existing DVD. The software moves step-by-step though the process to assemble,
edit, and burn your disc.
In the first Add/Edit Media screen, you assemble the list of clips you want
to include on your DVD. You can import common video files, capture from a
variety of sources, now including directly from HD camcorders, and extract from
existing DVD discs.
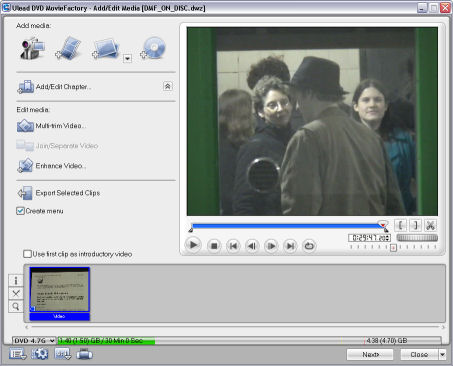 Add/Edit Media
Once imported, you can set chapter points: manually, at fixed intervals,
and/or at scene cuts. Then you can edit the clips: splitting, extracting, and
joining them. Use the Multi-Trim tool to select sub-clips from a longer video
with smooth "AccuCut" frame-accurate precision, and apply the new
Ad-Zapper option to automatically find commercials within a TV broadcast.
As you assemble your clips, also use the Enhance Video screen to
automatically apply transition and enhancement (brighten and contrast) effects,
add text overlays, and mix background music tracks and even record voice
overlays.
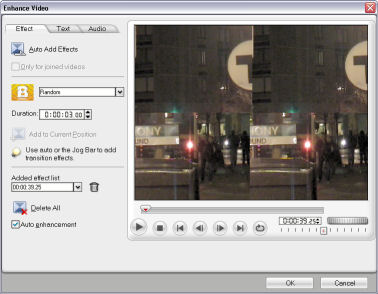 Enhance Video
Also use this screen to create photo slideshows, complete with background
audio, transitions, and pan and zoom motion over each slide. You also can
Decorate individual slides with overlays of text, "props" (graphical
designs), and even additional photos. There's even a built-in Express Fix tool
to apply common photo fixes, including exposure, color, focus.
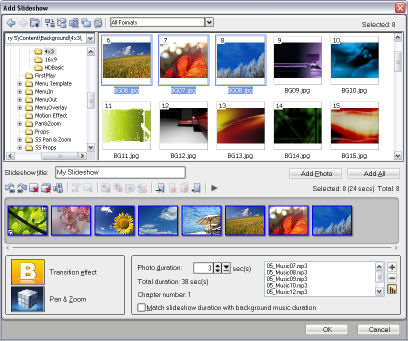 Add Slideshow
And DVD Movie Factory provides the nice option at this point to Export your
edited clips, so you can capture, trim, enhance, and save video files directly
within the application.
Once you are done assembling your videos and slideshows, click Next to move
on to the Setup Menu screen. The Gallery tab offers a variety of pre-defined
menu templates, with text, video thumbnails, and the new SmartScene menu design.
SmartScene provides a text menu listing the available clips with a single large
video preview area that automatically switches as the viewer steps through the
menu to display the associated clip.
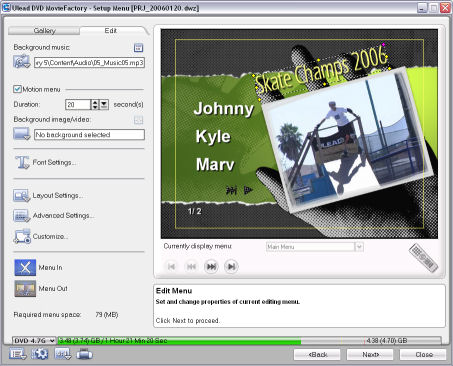 Setup Menu
The menu templates are great for automatically laying out your content into
menus, but then DVD MovieFactory provides great flexibility in customizing the
designs. You can change the menu background image or video and audio, apply
motion and pan and zoom effects to background images, and choose different
button layouts (to squeeze more buttons per menu). There's also new menu in /
out transitions to smoothly transition between menu and video and back.
You then can edit each element within a menu: adjusting the title text and
moving, resizing, and even rotating the buttons and text.
Click the Preview icon to check your DVD project and preview the menu
navigation. Then click Next to move on to the Finish step to burn the project --
to DVD disc, or to hard disk as DVD folders or a disc image file.
Roxio MyDVD 8, released in February 2006, is a rebranding and
restructuring of the Sonic MyDVD product line (www.mydvd.com),
integrating it with the Roxio Easy Media Creator collection of tools, as Sonic
further integrates its purchase of Roxio and focuses the Roxio brand on consumer
products. As a result, MyDVD 8 is somewhat in the midst of a transition, with a
new interface, and missing some of its legacy features (which should reappear in
later releases).

Roxio Easy Media Creator 8 Suite is now the full disc burning suite,
including the full MyDVD 8, plus video and photo editing, and data burning and
backup tools. MyDVD 8 then is available separately for those who want to focus
on DVD authoring. MyDVD also includes various helper components from EMC,
including for video and photo editing, and media management and sharing. Instead
of MyDVD being a single application with built-in capture, video editing, and
slide show creation, it now launches the additional EMC applications and
assistants to perform these and other editing functions.
Besides the new design and workflow, the big new addition to MyDVD 8 is
support for importing HD formats, including from HD camcorders, TV shows, and
DivX HD. You then can create full widescreen HD discs, and burn them to current
DVDs in DivX HD format, to play back on DivX-compliant set-top DVD players.
MyDVD 8 is available in two versions: the full MyDVD 8 Premier (discussed
here) for $69.99 supporting high-definition and widescreen video, and the
entry-level MyDVD 8 Essentials for $49.99, with basic authoring and light
editing features for standard-definition video.
Even though MyDVD 8 is focused on DVD authoring, it still installs an
impressive collection of media tools taken from the full Easy Media Creator
suite. The MyDVD 8 Home screen provides a task-oriented list of your
available options, to help launch the proper application for your project.
You can use the Media Manager to view and organize your media files.
It also has two interesting sharing options: use My MediaSpace to share media
using UPnP (Universal Plug and Play) with other computers on your local home
network, and also with compatible set-top devices. And the Roxio LiveShare
feature allows you to share media across the Internet using peer-to-peer
connections.
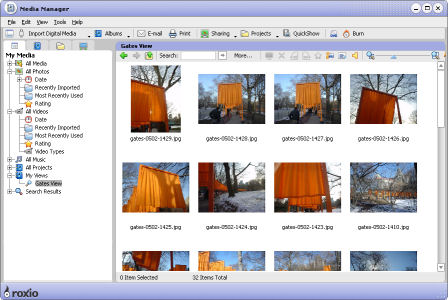 Media Manager
The MyDVD 8 application has a new interface design, actually with two
different workflows. To get started, use the Guided Task Assistant workflow to
step through the DVD creation process with MyDVD Express, Slideshow
Assistant, and CineMagic Assistant (for simple video editing). Then
you can get more control with the full "Work on Your Own" workflow,
using the full MyDVD 8 interface to design and customize your DVDs, and
the full VideoWave editor for your video clips.
The new MyDVD interface is focused on menu design. The optional Task Pane
down the left side of the screen provides one-click access to menu design and
editing functions, and also includes a handy hierarchical project tree viewer to
review your menus (and buttons) and movies (and chapters). You then add elements
to your menus, and use the additional Roxio components to further edit and
refine them.
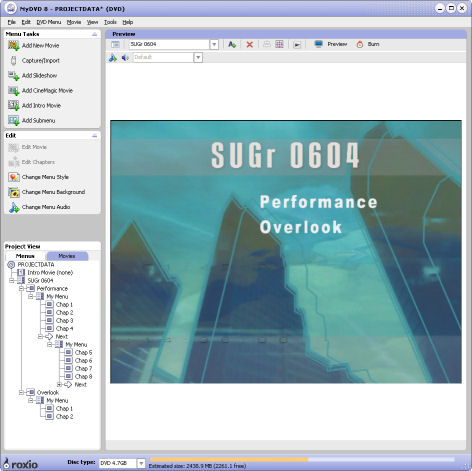 MyDVD interface
Or to quickly transfer from a videotape to a DVD, use Plug & Burn:
Just select the menu style, set the capture quality, and choose whether to
create chapters at regular intervals, or at scene breaks. MyDVD then transfers
your tape to disc, and then adds the menus and navigation, complete with video
thumbnails. Unfortunately, in this release the option to set the capture time
(i.e., for a half-empty tape) is missing, and the chapter points are placed a
beat early before the scene cut.
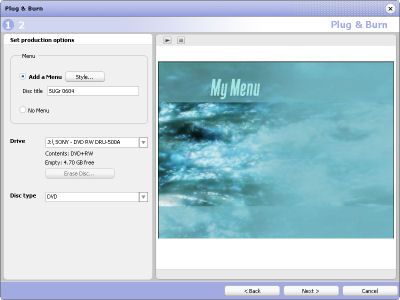 Plug & Burn
But after your quick capture, you can come back and use Edit DVD Disc to
further edit and refine the disc once it has been created. For example, you can
adjust the chapter points (after copying the project to hard disk), add
explanatory menu titles and button text, import additional clips and slideshows,
and even totally change then menu styles.
To capture clips, choose Capture/Import to launch the Roxio Media Import
tool to grab new videos, audio, and photos. Use the SmartScan feature with a DV
camcorder to quickly scan the tape to find scene cuts, and then import only the
desired scenes.
To add existing video clips to your project, use Add New Movie to launch the
Media Manager to preview and select clips.
To quickly assemble a video, use Add Cinematic Movie to launch the automated CineMagic
Editor, which can analyze a run of raw video footage and extract a shorter
clips with professional-looking editing, complete with soundtrack and effects.
Or use Edit Movie to open the Video Production Editor (VideoWave)
to edit and enhance a clip, with a chose of Storyline (storyboard) editing, or
the Timeline Editor with multi-track editing, with multiple clips, overlays,
titles, effects. You also can trim clips, and add picture-in-picture photo and
video overlays. Also use the Pan and Zoom Motion Editor to add motion effects
over videos and photos -- using presets or manually defined motion paths.
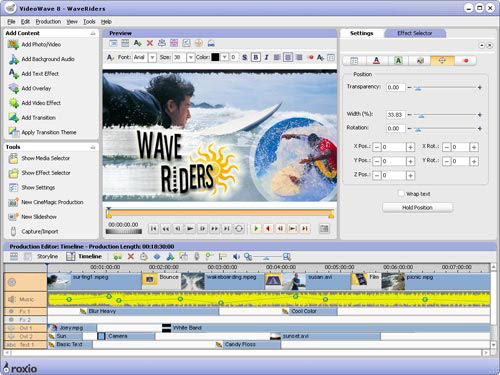 VideoWave
When you are done editing video, you can save the results as a video file in
various formats, as well as include the clip on your disc in MyDVD.
Then use Add Chapter to insert and adjust the chapter points within a clip,
and optionally create a nested chapter menu to access the individual chapters.
You can set chapters manually, use automated scene detection, or insert at fixed
intervals or at the breaks between edited clips and photos.
Not surprisingly, you can use Add Slideshow to launch the Slideshow
Assistant to create photo slideshows with up to 999 photos, in normal aspect
ratio or widescreen. Add transitions -- including displaying multiple images
simultaneously, apply pan and zoom motion effects, enter overlay text, and add
background audio tracks. For touching up individual photos, use the Pocket
Photo Editor to apply common adjustments including cropping, rotating,
red-eye removal, exposure and color adjustments, and AutoFix.
As you add elements to your menus, MyDVD provides direct control over
both customizing their look and organizing the menu structure. Click Add Submenu
to create nested submenus within a menu, allowing you to create a hierarchy to
organize different collections of clips or slideshows.
You also can use Add Intro Movie to select a clip that will be played each
time the DVD starts playing, before the main menu appears.
Use Change Menu Style to change the look of a single menu, or all the menus
in the entire project. Similarly, use Change Menu Background to select a new
background image or video, and Change Menu Audio to select background music.
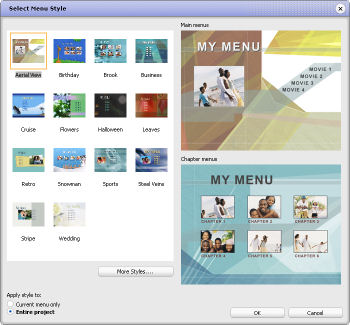 Menu Styles
Then edit the look of individual menus by adjusting the menu elements: move
and resize the buttons or auto-arrange and resize them, add additional text, and
edit and reformat the title and text.
As you edit, click the Preview button to see how your DVD plays back,
especially to check the menu layout and navigation.
When you are done, click the Burn button to burn your project to disc, and
/or create the DVD on hard disk as a DVD folder or disc image file.
As you can see, both Ulead (recently purchased by InterVideo)
and Roxio (purchased by Sonic) have significantly re-focused their
consumer DVD authoring tools, adding support for high definition video and even
more customization of the DVD design.
Ulead DVD MovieFactory 5 has been refocused on just DVD authoring,
with built-in support for related functions including capturing and importing
media, and editing video and slideshows.
Meanwhile, Roxio MyDVD 8 is in transition in the opposite direction,
focusing the MyDVD application on DVD menu authoring, and using external
components from Easy Media Creator to provide supporting features.
Your choice will really come down to your existing familiarity with these
products, and your desired working style. If you like all the elements of the
Easy Media Creator suite, then MyDVD is right for you. But if all those
applications get too confusing, then the more integrated DVD MovieFactory may be
more comfortable.
Ulead DVD MovieFactory 5
www.ulead.com/dmf
Roxio MyDVD 8
www.mydvd.com
Originally published in Camcorder &
Computer Video magazine, 22, 6, Aug. 2006.
|
